
JEEP Light Bar Wiring Guide
(This is part of our larger Light Bars for Jeep Guide.)
General Wiring Info
Installing KC lights on your Jeep can be a great way to improve your visibility when driving at night or in low-light conditions. Here is a step-by-step guide on how to wire KC lights on your Jeep. Keep in mind that all installations may vary, and this is a general overview.
Step 1: Choose your lights and mounting location
First, choose the type of lights you want to install on your Jeep, such as LED light bars, fog lights, rock lights, or another KC HiLiTES light option. Determine where you want to mount the lights on your Jeep (bumper, A-pillar, roof, etc.) and ensure the location is appropriate and won't interfere with other vehicle components (winches, tow hooks, other lights) or functions (active cruise control, cameras, etc.).
Step 2: Gather necessary tools and equipment
You will need a variety of tools and equipment to complete the installation. For a standard install of the wiring harness included with your KC light bar, this list is minimal and includes a set of wrenches and screwdrivers. For connecting it to an switch system, this may additionally include wire strippers, crimpers, electrical tape, heat gun, heat shrink tubing, cable ties, and more. Different installations and products will require different tools and equipment.
Have all the tools and equipment needed before starting the installation. KC wiring harnesses remove the need for many of these tools. However, if you’re customizing the harness, connecting to a switch panel, or have special wiring needs, you’ll want all on hand.
Step 3: Install the lights
Once you have determined the mounting location, mount the lights on your Jeep following the KC’s instructions. Make sure the lights are securely mounted and won't move while driving. Using thread lock, such as Loctite Blue, can aid in keeping lights from rattling loose over time.
Step 4: Run the wiring
Run the wiring from the lights to the location where you will install the switch. Ensure the lights aren’t in contact with sharp items, hot surfaces, or moving components that could damage the wiring. KC offers a host of accessories that can help with clean installations, such as our Universal Wire Hiders.
Step 5: Install the switch
Install the switch in a location that is easily accessible, such as on the dashboard or center console. Next, follow the instructions for wiring the switch. Be sure to run the wiring to the switch’s location before drilling a hole for the switch. This way you’ll have enough wiring to reach the switch. Before drilling, be aware of what may be behind the switch. This could include wiring, air vents, airbags, and more.
Step 6: Connect the wiring
Connect the wiring from the lights to the switch. If customizing a harness, use wire strippers to remove a small section of insulation from the end of each wire, and then use crimpers to attach connectors to the appropriate wires. KC wiring harnesses will not require this step. Note: modifying a KC wiring harness can void your warranty and/or be unsafe, so be sure to follow the included instructions for your particular lights.
Step 7: Install a fuse
KC harnesses include an inline fuse holder/fuse that includes the fuse rated for our lights. If you are customizing it yourself, install a fuse holder near the battery and connect it to the positive wire from the lights. Choose a fuse with a rating that matches the current draw of the lights. If unsure, contact us at [email protected] or call us at (888) 689-5955.
Step 8: Test the lights
Test the lights to ensure they are working properly. Make any necessary adjustments to the mounting or wiring if needed.
You’re Finished!
With these steps, you should be able to successfully wire lights to your Jeep. Remember to always follow our instructions and take appropriate safety precautions when working with electrical components.
If you still have trouble, please reach out to [email protected] or call us at (888) 689-5955.
Troubleshooting
Having an issue with your lights? Here's a troubleshooting guide for solving problems you might be having:
- Check the wiring: The first thing you should do is check the light’s wiring. Make sure all the connections are tight and secure. Loose connections can cause your lights to flicker or not turn on at all. Also, check for any damaged or exposed wires that could be causing a short circuit.
- Check the ground: Make sure your lights are properly grounded. Without a good ground, your lights won't work properly. Check the ground wire for signs of damage, and make sure that it is securely connected to a good ground source.
- Check the switch: If your lights won't turn on, it could be a problem with the switch. Check to make sure that the switch is properly connected and functioning correctly. If it's not, you may need to replace the switch or inspect the wiring leading to it.
- Check the fuse: If your lights are flickering or not turning on at all, another problem could be the fuse. Check the light’s fuse to make sure it’s not blown. If it is, replace it with a new fuse of the correct amperage and retest.
- Check the vehicle’s battery: If your lights are draining your battery, it could be a sign that your battery is weak or failing. Check the battery’s voltage to make sure it’s holding a charge. If it's not, you may need to replace the battery.
- Check the alternator: If your battery is fine but your lights are still draining the battery, it could be a problem with the alternator. Check the alternator’s voltage output to make sure that it is charging the battery properly. If it's not, you may need to replace the alternator.
- Consult a professional: If you've tried all of these steps and you're still having problems with your aftermarket lights, it may be time to talk to an expert. A mechanic or auto electrician can help diagnose and fix the problem. You can also contact us at [email protected] or call us at (888) 689-5955.
Remember to always take safety precautions when working with electrical systems, and seek a professional if you're not confident in your ability to diagnose and fix the problem.
Tips & Tricks
Here are some general tips, tricks, tools, and safety considerations when wiring your Jeep with KC lights.
First and foremost, have a plan for wiring your lights. Before you start, plan out the wiring route, and make sure that you have all the necessary components and tools.
- Test your lights before mounting them to your Jeep! If you have an issue and don’t test before, you may need to undo all of your wiring and reinstall. Test your lights before you mount them.
- All KC harnesses will include the correct wiring gauges. However, if you’re customizing your lights, be sure to use the correct gauge wires. The wire gauge should be able to handle the amount of current that the lights draw without overheating or causing a short circuit. If you’re not sure which gauge to use, consult an expert or contact KC at [email protected] or call us at (888) 689-5955.
- All KC harnesses will include a proper relay when required. However, if customizing a harness or making your own, you may need to utilize a relay. A relay allows you to switch on the lights with a low-power signal, which reduces the load on the switch and prevents overheating.
- Use a fuse: Always use a fuse to protect your wiring and components in case of a short circuit. The fuse should be rated to protect the wire and components from the maximum current that the lights draw. KC does not supply replacement fuses.
- Waterproofing: All KC connectors and wiring harnesses are weather-resistant and durable, but it is still good to route them in areas that are not prone to much water ingress, to prevent moisture from causing a short circuit or damaging the wiring.
- Use thread lock on fasteners: To prevent lights from loosening from vibrations on the trail, use a thread lock, such as Loctite Blue, on bolts. Also regularly check to ensure hardware is tight.
- Choose switch locations carefully: When it’s time to drill a hole and mount your switches, ensure a proper location. Be aware of interior components such as other wiring, vents, hoses, or airbags before drilling a hole for the switch. Also, run your wiring to that spot before drilling. This will ensure there’s enough wiring to reach that location.
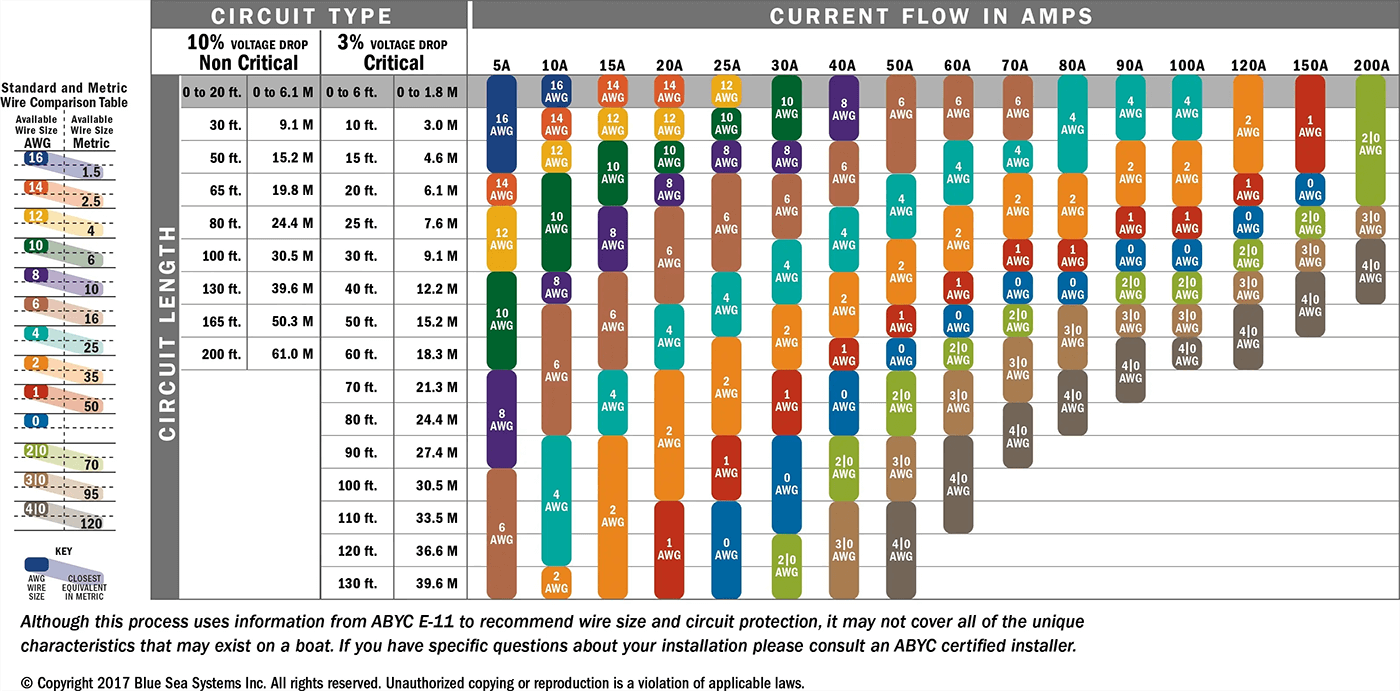
Off-Road Vehicle Wiring Gauge and Amperage Chart
Looking to build a custom wiring harness? Here's a useful chart that outlines the gauge of wiring that is required at various amps and wire lengths from the folks at Blue Sea Systems:
Glossary of Terms and Tools
- Wire strippers and crimpers: You’ll generally only need these if customizing a wiring harness. They’d be used to remove the insulation from the wire, while crimpers are used to attach connectors to the wire.
- Electrical tape and heat shrink tubing: Electrical tape is used to insulate and protect the wiring, while heat shrink tubing is used to seal and waterproof the connections. Unless you’re customizing a harness, you likely won’t need these.
- Multimeter: A multimeter is used to measure voltage, resistance, and continuity in the wiring. This is useful for testing, but not required for installation.
- Wiring Harness: A wiring harness is an assembly of wires and connectors used in electronic and electrical systems. Its primary function is to efficiently transmit signals or electrical power. In this case, it will connect your battery, lights, relay, fuse, and switch into one working unit.
- Fuses: Automotive fuses are used to protect the wiring and electrical equipment for vehicles. There are many variations of sizing and current flow capacities. In general, a center piece of metal within the fuse is designed to fail when more than a specific level of current flows through it. When that happens, the electrical contact between the two blades is interrupted and now longer completes the circuit.
- Relays: An electrical relay is a type of switch controlled by an electric current used to open or close another circuit. They help to handle power, prolong switch life, reduce voltage drop, and provide another level of safety when using high-powered LED lights. All KC harnesses include a relay when necessary.
- Switches: A switch is a basic electrical control allowing you to turn your lights on an off. KC lights will always include the right kind of switch for the appropriate lights. If customizing your lighting system, be sure to check with an expert when it comes to selecting the right switch.
- Aftermarket Switch Panels: These units allow you to run multiple accessories to a single panel versus running it directly to the battery. KC lights can be wired to switch panels if so desired.
Safety
Whenever installing, maintaining, or removing lights from your Jeep, it’s important to follow these safety precautions.
- Turn off the power: Before working on your wiring, turn off the engine and disconnect the battery to prevent accidental shocks or short circuits.
- Wear protective gear: Items such as gloves and safety glasses should be used when working with electrical components to prevent injury.
- Don't overload the circuit: Make sure that the wiring and components are not overloaded and that they are rated to handle the amount of current that the lights draw.
- Turn to a professional: If you're not confident in your ability to wire your Jeep with off-road lights, seek professional help from a mechanic or auto electrician.
Wiring your Jeep with aftermarket off-road lights requires careful planning, the correct tools, and safety considerations to prevent injury or damage to your vehicle. By following these tips, using the correct tools, and taking safety precautions, you can safely and effectively wire your Jeep with KC lights.
Hire an Installer
Not everyone wants to install their Jeep light bar themselves; some would rather leave it to a professional. When hiring a professional to install your KC lights onto your Jeep bumper, it's important to find a reputable and experienced installer who can ensure that the installation is done correctly and safely. Here are some things to look for when hiring a professional to install your off-road lights:
Experience and expertise: Look for an installer who has experience and expertise in installing off-road lights on your type of vehicle. They should be able to provide references and examples of previous installations. They may even put you in touch with another nearby customer who could show you their installation.
Reputation: Check the installer’s online reviews, ratings, and testimonials to see what previous customers have said about their work. This will give you an idea of their reputation and the quality of their work.
Warranty: Ask if the installer provides a warranty on their work. This will give you peace of mind and protection in case anything goes wrong with the installation.
Price and estimate: Ask for an estimate and compare prices with other installers. Be wary of prices that are significantly lower (or higher) than other installers, as this could be a sign of low-quality work or hidden fees.
When you meet with a potential installer, here are some questions you can ask to determine their experience and expertise:
- How long have you been installing off-road lights?
- Have you worked on my type of vehicle before?
- Can you provide references or examples of previous installations?
- What kind of warranty do you provide on your work?
- What is the estimated cost and timeline for the installation?
Finding a reputable and experienced installer for your KC lights is crucial for ensuring that the installation is done correctly and safely. Look for an installer with a good reputation and who provides a warranty on their work. Ask questions to determine their experience and expertise, and compare prices and estimates with other installers to ensure you're getting a fair price.
If you need more information please reach out to [email protected] anytime M-F during work hours. Remember, these are general steps, and your specific product or vehicle might require different procedures. Always refer to the manufacturer’s instructions for the best results, and consider professional installation if you are not confident in doing it yourself.
KC HiLiTES’ JEEP NEWSLETTER
Sign up for KC’s newsletter specifically for Jeepers! From the latest new products to tips and tricks, this newsletter is focused on the Jeep community. Sign up now!
